December 29, 2006

Win a free PURSuE Your Art Purse!

My pals Mary and Erin from PURSuE Your Art are hosting a contest to win a free stamp-able purse! You can read all about it here...

PURSuE Your Art!

The deadline is Jan 4th so send in your cards today!


Mary and Erin from PURSuE Your Art...
holding MY Purse!

December 27, 2006

Spend Your Holiday Cash NOW!

Just a reminder! The 1/2 off sale is still going on through the end of the month! Plus I am offering an AMAZING deal to my readers only (LOOKY HERE) until the last day of the month. Place your order with me before the 29th at noon to insure that it is received in time. Orders can be shipped anywhere in the United States. Don't miss out!

Stampin' Up! is offering six selected stamps sets at 50% off their regular price when you make a $30 purchase!

Love Ya Bunches Regular Price: $17.95 Now: $8.98

Rough Edges Alphabets Regular Pice: $19.95 Now: $9.98

Merry Regular Price: $22.95 Now: $11.48

Tag Time Regular Price: $26.95 Now: $13.48

Mini Mates Regular Price: $29.95 Now: $14.98

Sketch It Regular Price: $34.95 Now: $17.48

I hope you all had a Happy Holiday and I look forward to a New Year of Stamping and Celebrating with you All!

December 22, 2006

The Perfect Cookie

Today I share with you the perfect cookie; "Kima's Melt-a-ways". Kima was my Grandmother, and this was her most famous cookie. It was tradition in our family to go to her home on Christmas Day. She always baked a tray of melt-a-ways for us to share... they were gone BEFORE dinner! Melt-a-ways are so soft and buttery... the name says the rest. The recipe is very simple; and you probably have everything you need in your pantry. They are easy to make, and I promise you will love them.


Kima's Melt-a-way Cookies

1/3 Cup Powdered Sugar
3/4 Cup Cornstarch
1 Cup Flour
sift dry ingredients and blend with...
1 Cup Softened Salted Butter (must use real butter)

Bend until creamy. Refrigerate for one hour. Preheat oven to 350 degrees. Line a cookie sheet with a silpat mat or parchment paper. Roll dough into marbles no larger than 1". Place on cookie sheet and press down lightly with palm. Cookies will not spread much so you can place them close together on the sheet. Bake for approximately 12-14 minutes or until edges turn slightly golden. Allow to cool slightly on sheet before transferring to a rack to cool throughly.

The Frosting

Melt 2 Tablespoons Butter in a microwave safe dish. Combine with 1 Cup Powdered Sugar. Add a very small amount of milk and stir until frosting is smooth and spreadable. If frosting is too watery add more powdered sugar. Kima used to dye her frosting pink; but I like them plain and buttery looking.

Frost cooled cookies with an offset spatula. If you like you can top with sprinkles of your choice or leave plain. Let set until frosting hardens slightly. Store in a covered container for several days or freeze.

Makes approximately 30 cookies. Do not double recipe but instead make 2 separate batches.

December 17, 2006

Dysfunctional Family Bingo


BINGO game: close up on family
Originally uploaded by wardomatic.
I first read about Dysfunctional Family Bingo in the December 2002 issue of Oprah's "O" Magazine. Martha Beck wrote a wonderful article on how to kick up the "fun" in Dysfunction... Here's how to play:

Before the next holiday event, gather up your friends and family and make your bingo cards. I use a 5X5 square grid.. .but you can decide on more squares or less depending on the dysfunction in YOUR family. Now everyone fills in their individual cards. Think about those things that you might expect to see at your Holiday family gatherings. In my case for example I might write; "Mom is passive aggressive", "Dad tries to sell me vitamins", or "Molly is late and misses dinner". Each player will have their own unique card.

Now you could play for money... or just for bragging rights... but the best part is that those things that made you cringe in the past will now make you squeal with delight! This year when your grandma pours her 5th martini and yells at your father you can pull that card out of your pocket and place an "X" in that square!

I hope your Family Holiday Parties are as Entertaining as Mine!

December 16, 2006

Now for Something Completely Different!

So here is something exciting... I have adjusted my stamping focus toward MORE STAMPING. I love Stampin' Up! and I am truly devoted to their products; but I am also an artist at heart, and since I became a demo, I sort of miss stamping just for me! My goal for 2007 is to get on some design teams, and get my some of work published. I will still be teaching classes and having workshops... I adore sharing my love of stamping with others.

Last week I decided to contact all my favorite stamping companies and offer up my services. And low and behold; I was contacted back immediately by Hampton Art and they sent me stamps two days later, and I was overnighting work for them 24 hours later! The turn-around time was actually less than one week from the point I inquired to the point I sent out my work! I was just amazed!

The images they sent were very different from my usual style. But I appreciated the challenge, it really was inspiring to have to think out of the box. I hope you like what I came up with. I would love your comments.

This first card was stamped with an image called "San Francisco Diva". Isn't she swanky? I chose these colors based on some 1940's advertising layouts I have; Regal Rose, Taken with Teal, Creamy Caramel and So Saffron. I used a woodgraining technique on the caramel background, and the image was stamped in Staz-on and watercolored with Watercolor Wonder Crayons. I sponged Creamy Caramel onto the finished focal image to add to the vintage look. The Teal Velvet "Flirty" Ribbon seamed the perfect match, and I love the tactile touch it adds.


The next image is called "New York Diva"...and she is such the sophisticate! I chose the color combination; Ballet Blue, More Mustard, Bravo Burgundy and Brushed Silver after doing some research on Art Deco. This was a color combo popular in Art Deco advertising; and I like how it has that 3 color block printing look popular in old ads. I embossed this image on Velum Card Stock using black craft and detail clear powder (no stray flecks, and the detail powder doesn't mud up the fine etched image). And then colored on the BACK of the velum with markers. I ran the velum through my Xyron machine so the adhesive is invisible. The silver photo corners were created using the 3/4" Square punch; cut on a diagonal and then snipped into the shape I needed. The Art Deco embellishment on the left was made with the 1/2" and 3/4" circle punches. I sponged all the Brushed Silver paper with Staz-on to create a pewter effect.

December 15, 2006

I'm Dreaming of a Pink Christmas!

I love that Shabby Chic meets ultra modern look; I had a super cute gift bag with Real Red, Bravo Burgundy and Pretty in Pink dots... so I thought I'd try to make a tag to match! I used Snow Flurries and Little Pieces (big dot)... an eraser from a pencil was used to make the small dots in White Craft ink. The sentiment "Happy Holidays" from the hostess set Warmest Regards was stamped in Real Red craft ink, then embossed with detail clear powder... as was the smaller chipboard circle on the left. On Board Accent rounds, a clear button stamped with white Staz-on and a small burgundy off brand button complete the look! I like how it turned out. I only wish I had straightened my bows a bit before I snapped this shot!

December 11, 2006

A Quick Tip!

Here is a tip that will help you keep your Heat tool accessible, out of the way and stored safely! I took the metal stand off the tool and reversed it. Now I can hang it in my work area; the hot tip will not come in contact with all my paper scraps, and it's out of my way! I even strung the cord up and over my head... my studio is in my unfinished basement so I have a bunch of pipes above me... plenty of places to hang things!

I like keeping my supplies accessible this way; especially embossing materials that can be cumbersome to use otherwise. See in the the picture below... to the right of my Heat Tool? That is a stack of Rubbermaid trays filled with embossing powders. They are kept handy and ready to use this way! No more cleaning trays off after each use or spilling powders!

December 5, 2006

More on the CD Tin Album

THANK YOU!
I have received an amazing amount of email about this CD Tin Album.
I wanted to give a few more details about how it was made...

The only stamping here is done on the OUTSIDE of the tin!

The decorative band is also known as a "belly band". I wove "flirty" ribbon through holes I punched with the 1/2" circle punch. The Heart and the small "doo-dad" (extremely technical term!) with the ribbons are from Stampin' Up's! On Board Accents collection. I covered the heart with "Loves Me" double sided Designer paper, and I embossed the "doo-dad".

This is an impressive but SIMPLE project... it is also very affordable. The "Sweet Nothings" Accents and Elements Kit from Stampin' Up! is only 7.95... it includes the cute tin and 12 self adhesive die cut sheets.


The kit also matches the new "Loves Me" papers, "Flirty" ribbon originals, and the Stampin' Up! inks, papers, ribbons and accessories you already own. Plus there are several Stamp Sets in the New Winter Mini that also match. I am so impressed with the value of this new product!


Here are some Step by Step tips to get you started...


Embossing the CD Tin:

Clean the CD tin with Windex or similar cleaner.
Use your Embossing Buddy to further remove any static or oils.


Use Versamark to stamp your image.


Sprinkle Silver embossing powder generously over your stamped images. I keep my Embossing powders in clear, disposable Rubbermaid containers. My powders ready at all times, and stored safely! After applying powder use a small brush to remove any stray specks.


Emboss your tin with a Heat tool.
I like to place metal items in disposable pie tins when I heat them.


Pages Inside:
First view upon opening...


Inside Pages...


Those Cool Tabs:

The sweet little tabs on top of the pages are made with the Stampin' Up! Slit Punch!

Cut a 2" wide strip and use your punch along the edge of the card stock, make sure one punch just touches the last. Use "as-is" for a cutsey scalloped boarder, or cut the tabs/tags off the strip free-hand.


Use your 1/2" punch to cut circles from the "Loves Me" Double sided Designer paper.


These little circles fit PERFECTLY in the tabs! Affix them to the top of the page as shown.


December 4, 2006

Links to the Free Online Classes...

I uploaded my Free Online Classes at The Shaker Box...
I invite you to check 'em out!


CD Tin Scrapbook


Snowman Game Ornament


Beaded Pen Class


Back Pack Mini Book


I hope you all enjoy the classes! Remember; you will have to register at The Shaker Box to view the complete class (with pictures). You can register without hesitation; this is a great forum, and the women you keep the Shaker Box Shakin' are super sweet!

December 3, 2006

Free Online Classes!

Firstly; some basic business... The Winter Mini is now available! Did you get yours? Contact me if you need one. You will not want to miss this one gals... I have practically ordered the whole catalog! The card below was made with Winter Mini stuffs; "Loves Me" double sided Designer Papers, and the adorable set "Sweet on You". This color grouping is so yummy; Taken with Teal, Cool Caribbean, Pretty in Pink and Regal Rose...YUM! You can look HERE for the full recipe.


Ok...now for some FUN! I have some exciting news to share. I have been asked by my newest stampin' friend AnneMarie Zimmer to participate in an Online Holiday Open House at a web forum for Scrapbookers called The Shaker Box. AnneMarie is on their Design team... and boy, oh-boy are these ladies talented! The Open House has been going on all weekend; but I will be participating on Monday....all day. Go to The Shaker Box now to register (it's free, and very worth it), then you will be able to participate in my free online classes on Monday!

I will be demonstrating a wonderful (and water resistant) Backpack Mini Book, and also a super cute CD tin scrapbook... made with our brand new "Sweet Nothings" Accents and Elements from the Winter Mini. This is a great new product, only $7.95 and perfect for quick cards and scrapbooking. What I love about it most is that it matches multiple stamp sets from the mini; Carte Postale, French Flair, Fancy Flexible Phrases, Sweet On You and Big Pieces. It also goes wonderfully with the above mentioned "Loves Me" papers and the new "flirty" Ribbon Originals which are so beautiful they make my eyes water! Don't ya love when stuff matches!

I will also feature a Snowman Ornament that doubles as a GAME, and a simple stocking stuffer you will want to keep for yourself! I'm sure I will be up ALL NIGHT on Sunday getting ready!

So go to The Shaker Box right now to register so you are ready to play on Monday!

December 2, 2006

Stampin' Up! Holidays at Half Off!

If you still haven't finished your holiday shopping, or just want to give a little gift to yourself, you won't want to miss this opportunity to get beautiful Stampin' Up! stamps at half off their regular price! Perfect for gift giving, Stampin' Up! is offering six selected stamps sets at 50% off their regular price when you make a $30 purchase!

Click HERE to see an additional December discount for my readers ONLY!

If you want your stamps to arrive in time for Christmas, make sure you order them early. Orders placed before December 15 should arrive in time for Christmas. Orders placed after this date may experience holiday shipping delays.


Love Ya Bunches Regular Price: $17.95 Now: $8.98

Rough Edges Alphabets Regular Pice: $19.95 Now: $9.98

Merry Regular Price: $22.95 Now: $11.48

Tag Time Regular Price: $26.95 Now: $13.48

Mini Mates Regular Price: $29.95 Now: $14.98

Sketch It Regular Price: $34.95 Now: $17.48


Email me now to place your order: use the link on the right >>>


Tip: Use your Two-way Glue pen and Dazzling Diamonds
Glitter to add a little sparkle to your cards! It's such an
easy way to make a simple, one layer card like this one POP!

December 1, 2006

Crafting with Amy Sedaris!

If you don’t know who Amy Sedaris is then please go find out… I placed a link to her fan site in my last post, and you can look up a list of her films and TV shows HERE.

Needless to say; I am a huge fan. During High School we used to go see Amy when she was in the Second City Cast in the Illinois Suburbs. Steven Colbert, Steve Carell, and Paul Dinello were also memorable cast members from this time, and we’d go at least one Friday night a month for the free improv nights at SCNW. I totally fell in love with Amy’s work when her “spit-milk-out-your-nose-funny” show Strangers with Candy was on the air; and realized she was the same cutsie gal (so unlike the character she plays) from Second City! Now I suppose I see her more on David Letterman than anywhere else… she is the new Teri Garr! (If you don’t get the Teri Garr comment then you aren’t old… congratulations!) She is completely hilarious and quirky. I (and all her fans) am convinced she’d be a great friend if we had only crossed paths in some different way… She’s just got that sort of relaxed nature that plays with your brain. Plus her Brother David Sedaris is an amazingly funny writer who writes mainly about his family… so if you’re a Sedaris Family fan; you feel like you know them all! I’m sure they both get all sorts of oddball fan mail; because seriously…if I didn’t think it was outrageously socially inappropriate I would be sending her vintage pot holders and aprons in the mail… But Amy; if for some reason you have found this post out here in cyberspace and you DO want the potholders… just email me girl! I will send them out ASAP… or some Rubber Stamps…or whatever you need in your crafting arsenal.

I hope I can talk about meeting Amy without sounding like a total dork… I was seriously giddy all the way home, and since I have “come down’ from my buzz, I only worry that I might have made a complete ass of myself….but I don’t care! I crafted with AMY!

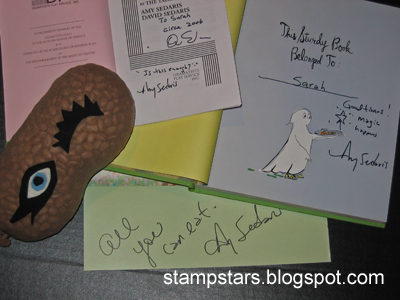
I arrived at Borders books on Michigan Avenue at about 3:30… so it took like 90 minutes to get there… in the rain. There were like 7-8 “Amy-super-fans” already in waiting…and I was definitely the oldest one there…for a WHILE! But that’s fine; I learned a lot about “what the kids are listening to these days”…and also…VERY important to know; if you don’t have a MySpace page (like me), you are such a looser… or a lame-O or whatever the kids are saying. So fast forward to 7:00; Amy appears in a super cute dress; the same one she wore on Martha…and it’s reversible; so cool! She opens her short talk with a craft! Looks in the crowd for a volunteer…and yes folks, she PICKS ME!!! So what if I was like the annoying pushy bridesmaid who tackles old ladies and children for the bouquet… SO WHAT! Na-na-na-boo-boo! I had so much fun; I don’t remember much, as I was in a full blown glee haze… We made an “Eye Burrito”. In the book she suggests you keep it in the freezer during the summer; “Lean back with the eye burrito over your eyes and take a five minute siesta. The weight of the burrito will rejuvenate your eye sockets.” Of course she picked on me a bit as I tried to pour Pinto Beans into a pair of Panty hose (I suggest a funnel Amy!), and reminded the audience this would be a very dangerous craft to do with the elderly; as they could slip on the beans. She also talked about her appearance on Martha Stewart… referring to Martha as “him”. I did tell her that her Brother David was involved in telling my mother I was pregnant (a yet longer story for another post)… she asked if I was actually pregnant…and yes I was… and a moment later she asked me in her Jeri Blank voice “So, did you keep the baby?”

She followed then with a short “Q and A” (that’s Hollywood talk for Question and Answer), and then signed autographs (see picture below). What a great time! Thanks Amy!


Amy examines my "scissors" pin and is worried I might be "one of those..."


The finished Craft! How soothing!


Amy autographs!


Conan O' brien did the same craft with Amy... but with worn pantyhose. Take a look!