September 28, 2006

My Halloween Spooktacular Stamp Camp!


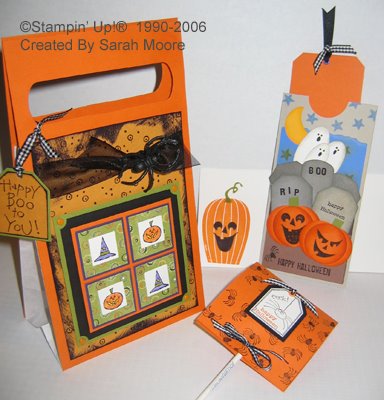
These projects were for my Halloween Stamp camp. I am especially proud of the Double slider graveyard card! It's made with mostly punches; The grave markers are the SU Tag Punch and Key Tag Punch, the pumpkins are 3 circle punches layered, the moon is a circle punch and the ghosts are oval punches in two sizes! Here is a Tutorial on Splitcoast for the Double Slider Card. The colors on the card are; Pumpkin Pie, Going Gray, Summer Sun, Ballet Blue, Close to Cocoa, Old Olive and Whisper White. I sponged around the Grave marker embelishments with Going Gray to add depth. Adding this extra touch to your punched embelishments really makes them POP!

As you can see; I used punches in most of my other projects too! The "Genie bag" used the Key Tag Punch for a handle. The front of the bag is made layering all the SU square punches. A note about the size; the central orange layer on the Genie Bag is 3"x3"... I love how that size works so perfectly with the layered square punches. The colors in the Genie Bag are Elegant Eggplant, Pumpkin Pie, Old Olive, Basic Black and the amazing "Halloween Night" designer papers from the Holiday Mini!

Stay tuned for more details on all these projects. Please subscribe to my blog for automatic updates!

September 27, 2006

Dyeing Ribbon... a "Neat" way!

Just a quick tip for today... I love dyeing white Stampin' Up! Grosgrain with our classic pads or reinkers; but it's messy right? So I thought I'd just use a marker the same color as the pad instead of my finger to run the ribbon across the pad. It works great! I found success when I put the ribbon in my dryer on high afterwards to set the color. Give it a try!


I have out of towners coming in from Florida this week. My friend Shannon is very Crafty (see her link on the right; Boogiebeads)... so I know I will have crafty adventures to share! Plus we have tickets to see Wicked, and Kane County Flea Market plans! So great!!!

I also still need to post about the Tinley Park Stamping expo, and the Renegade Craft Fair! My gosh... so much to tell you! Hopefully I will have a bit of time before my guests arrive to post a bit more for you all.

Thanks for reading today!

September 26, 2006

What FUN!


What a crowd! Last Saturday I hosted a Shoebox Swap for Splitcoaststampers in Illinois. We had 33 stampers in house and we had a BLAST! Some of the stampers were SU demos; one gal had JUST become addicted to stamping and this was literally her 2nd time stamping!

I must say; ALL the cards were really top-notch! I think the participants made an extra effort, and it was one of the best shoebox swaps I have participated in! I especially loved the Hand Stamped gift exchange, and the unique display items everyone brought!

It was a super friendly crowd too... everyone was buzzing about how nice and chatty everyone was; introducing themselves and making conversation. SCS'ers are just THAT way I guess! It was so fun to know we all had this fun thing in common! I often think of SCS as an imaginary world! How great it was to meet all my "imaginary friends"! Thanks to all of you who came!

Take a look HERE for all the photos!

September 18, 2006

And you thought I was a "Nice" girl!

Ok... I am a Splitcoast addict...and while I love the typical sweet card; I must confess I have a naughty side! I made this card for Kaylyn Conover's "Twisted and Demented" card swap. I posted an edited version on Splitcoast, but here it is in its entirety... Rated PG-13 I suppose!

You must know this is a very shimmery and sparkly card in person... hard to photograph; but the Truck is embossed with Black Craft and Iridescent Ice EP. The paper is Shimmery White and the snowflakes are Bashful Blue Craft ink and Iridescent Ice EP too. Other than the sentiment; it's a lovely card!


But wait! It's not so naughty!!! Tee Hee!


I hope I don't get coal in my stocking!

September 13, 2006

Back to Stamping Soon... I Swear!

Before we get back to our regularly scheduled programing... check out this teeny weeny baby! Could he BE any more sweet! Seriously... my ovaries ache when I hold him! WOW... I really do want a baby!

September 12, 2006

Welcome to the World Maxwell!

My cousin had a baby... or rather his wife did!

Maxwell Ryan

Was born on September 12th at !2:20 AM
8 pounds, 9 oz.
20 Inches long

Is this a pretty good reason for not stamping or blogging? I think so! I have also been watching too much TV... all the 9/11 stuff.

I can't wait to see this new baby tomorrow!

Check back soon... I have a great "Twisted and Demented" swap to show you, some fun stuff from our last local Scrap and stamp comvention, and my Halloween Stamp Camp samples! Thanks for checking in!

September 8, 2006

Help us Bill Gates! Help us!

So the Museum of Science and Industry is now officially LAME. I just don't understand how they don't have the cash to keep it up... or the staff to do the needed repairs! Call it the "Microsoft Museum of Science and Industry"; seriously... get Bill Gates on board! A few sections seem to be sponsored by companies; Sears in the Kids Area, John Deere and multiple Agricultural groups in the Farm area... that's all I saw. The exhibits are out of date and poorly done... lots of broken monitors, really dirty, sticky, dusty things... It was just YUCK!

The Big Bang button was not-so-surprisingly disappointing... no sound, no rumble... this little button just basically turned on a little light bulb behind a reflective panel; creating a small and unimpressive starburst. I somehow feel a button labeled "Big Bang" should be more... I don't know... monumental and leaning closer to planetary than light bulb.


Another busted Monitor!


Pluto Lives!


How do Scientists spell "destroy"?
Also note the cracked glass.

September 7, 2006

Do not, I repeat, DO NOT press this button!

Can you guess where a button like this might live? Pop in tomorrow to see!

September 6, 2006

Double Dyed Ribbon

This was something they demonstrated for us at Convention. To be honest, I had my doubts as I rarely use my pastels. They can be so messy! This technique however, is easy and has great results!

If you have ever dyed Stampin' Up! Ribbon with ink or a marker, then you know it soaks through both sides... but pastels don't. I used Stampin' Up!'s White Grosgrain ribbon for this tutorial. Please let me know if you try this yourself!


Using Bashful Blue Pastels and a Dauber apply the pastel to one side of the ribbon generously.


Using the same method apply Pretty in Pink Pastels to the other side of the ribbon.


So pretty, but we're not quite done yet. The ribbon is still a little powdery.


I forget where I learned this; just place the ribbon (or whatever else you need to spray) in a large paper bag and spray with hairspray. No mess!


Here is the finished card; with double dyed ribbon!

September 4, 2006

I Heart Ephemera

e·phem·er·a or e·phem·er·ons

1. A short-lived thing.

2. ephemera Printed matter of passing interest; Short lived. Those bits of throwaway paper of every day life (eg: advertising, ticket stubs, programs, some booklets and pamphlets, etc.)


I have Ephemera saved from Grade school. Ticket stubs, candy wrappers folded into flowers, pamphlets from vacations, autographs, postcards sent, received and bought. A paper crane from an artist’s collection of 1000 paper cranes she folded to make a wish come true (her wish was that AIDS would go away). An 1800's postcard I bought off Ebay because the artist shared my maiden name. About 5 years worth of Mary Engelbreit paper dolls meticulously cut from her magazines.

I took care of a woman whose daughter gave me a big box of old Christmas card cut-outs. They are so great; all flocked and glittered... embossed and yellowed. I guess Anne had cut the best images out of her favorite cards and saved them for years. Here she was; 80 years old, with dementia, living in an Assisted living facility... with her Ephemera... and no use for it anymore. I plan to hold on to it for her. I think about using some of it... sometimes... but I might never get around to it. I like to picture the cool shadow box collage Anne's Ephemera would make. But it would be a shame to lock the fuzzy brittle shapes behind glass. I think they serve a greater purpose sitting in my funky box courtesy of the always inspiring Oilily. I love to lay the paper treasures out and enjoy them as one might enjoy a small pet like a mouse or a frog. These are the kinds of things you keep in a suitable box and take out once and a while to play with.

I find it terribly sad to see "used" Ephemera in Flea Markets and Garage sales... Old photos, programs, even wedding albums with no one to love and take care of them. I have bought many a box of papers, just to take them into my warm home. Who would give these items away; or worse yet... inherit them and then sell them! "Here you can take this whole box of precious priceless memories for $3 bucks... I hated my Aunt Sylvia!"

I am the Cat Lady of Ephemera, and if there is ever a fire in my home I might prefer the safety of my paper memories over that of my actual cat.

Happy Labor Day!

Ephemera Society

September 2, 2006

Nuthouse!

So last night we wento to "Nuthouse". What a blast! It was a great group... not to crazy, not too quiet... great pizza and cake... wonderful company! This is my friend Nancy... she is my "partner in craft". She probably got the most finished... but I made the mistake of not bringing a PLAN... plus I talk too much!

I am getting very inspired by reading all these new Stamping blogs! I wish I had started reading them sooner. Thanks to all of you who blog!

September 1, 2006

What have you done with your Versamarker lately?

My Versamarker was sitting around collecting dust until last weekend. After much whining about not being able to get a ticket I attended Stampin' Up! Regionals in Chicago. It was money well spent; and I learned some great new Stampin' tips... one of which I put to immediate use.

I never thought to use the Versamarker to highlight an area on my Designer papers; or any existing non-stamped image for that matter. I love the end result. It reminds me of vintage Christmas cards or wrapping paper with glittered designs. I also LOVE these new Holiday Thyme papers... they are so retro!

Here is a quick and easy step-by-step on the process.


Choose an image to work with. I selected this cool poinsettia from the Holiday Thyme collection. With your Versamarker, draw on the areas you'd like to glitter or emboss. The Versamarker dries quickly, so you may need to complete a section at a time.


Dip the Versamarked image in Iridescent Ice Embossing Enamel. I use my tool kit tweezers to hold the image and I store my Embossing powders in these handy Rubbermaid trays. Tap gently to remove excess powder.


Slowly heat with Heat tool until powder melts and turns shiny! It's like magic!


The Finished Card!